The Basics:
- For ages 12 and up
- For 2 to 4 players
- Approximately 90 minutes to complete
Geek Skills:
- Counting & Math
- Logical & Critical Decision Making
- Pattern/Color Matching
- Strategy & Tactics
- Risk vs. Reward
- Hand/Resource Management
- Worker Placement & Area Control
Learning Curve:
- Child – Moderate
- Adult – Easy
Theme & Narrative:
- Explore and conquer a new land, but don’t let your ambition get the best of you
Endorsements:
- Gamer Geek approved!
- Parent Geek approved!
- Child Geek approved!
Overview
The land of Erin is green and full of promise. At least that is what it looked like from the ships anchored off shore. Once the tribes set foot on the island, they discovered a dark secret. Terrible monsters dwell here and move to push the explorers back into the sea. But ambition and the thirst for adventure is a powerful motivator, as is greed. Now the tribes fight not only for survival, but also dominance over each other in this new land. One must question who the real monster is…
The Arrival, by Martin Wallace and published by Cryptozoic Entertainment, is comprised of 4 Overview boards, 60 Building discs (in 4 different colors, 15 per color), 1 Round counter, 1 First Player tile, 8 Tracking tokens (in 4 different colors, 2 per color), 8 Blockers, 20 Sword discs, 4 Balor’s Castle tiles, 50 Fomori tiles, 54 Earning cards, 12 Shield discs, 1 game board (referred to as the “Map”), 30 Tactic tiles, and 6 Tribe Leader cards (double-sided). The cards are as thick and as durable as your standard playing card and the other game components (a mix of wood and thick cardboard) are of excellent quality. Artwork by Robert Altbauer, John Ariosa, Rica Bünning, and Kamila Szutenberg is “functional”. That is to say, there is enough there to help visually represent what the pieces are and reinforce the game’s theme.
Land! I See Land!
To set up the game, first place the Map in the middle of the playing area.
Second, place the Building discs, Sword discs, and Shield discs into separate piles to create the general supply.
Third, place the Tactic tiles face-down in the general supply area and then shuffle/randomize them. I suggest you put them into stacks to help keep the general supply area organized. From the face-down Tactic tiles, draw six and place face-up.
Fourth, place the Balor’s Castle tiles face-up on the four castle locations found on the Map.
Fifth, place the Fomori tiles face-down in the general supply area and then shuffle/randomize them. From the face-down Fomori tiles, draw eight. Four are added to the four Balor’s Castle tiles (one per castle) and one Fomori is added to each of the connected locations just south of those castles.
Sixth, shuffle the Earning cards and deal three face-down piles of 18 cards each. The different piles are supposed to have different card backs.
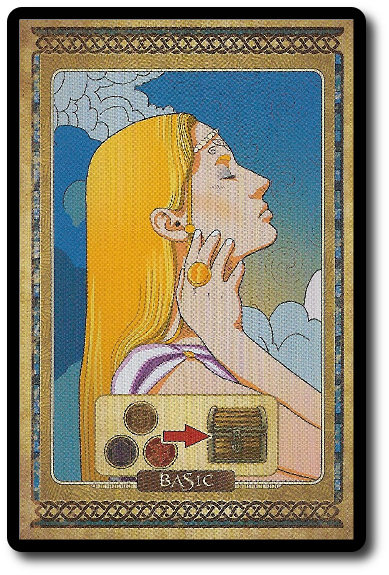
Seventh, determine who will be the first player and give that individual the First Player tile. Starting with the First Player, have each player select one Tribe Leader card and place it in front of them, basic side face-up (this is the side without any text except the word “Basic”). Then have each player select a color and collect two Building discs (of the color they selected), two Blockers, and one Overview board.
Eighth, beginning with the player to the right of the First Player, have each player take one Building disc of their selected color from the general supply (not one of the two they just took) and place it on any available (that is to say, not claimed by another player) Port location on the Map. Ports are indicated with an anchor icon. The colors on the Map have no impact on where the player places their Building disc.
Ninth, have each player place a Tracking token that matches their selected color on the “4” Honor Track space and the other on the “0” Corruption Track space. Both are found on the Map.
Tenth, place the Round counter on the “1” Round track found on the Map.
That completes game set up. Time to explore the green island of Erin!
A Dangerous Venture
The Arrival is played in rounds and turns for a total of four, five, or six rounds of game play depending on the number of players in the game. The game can also end before the number of available rounds if certain game conditions are met. Players have a mix of single and simultaneous turns, wherein players will take specific actions in turn order sequence and all at once. A game round is summarized here.
Step One: Draw Earning Cards
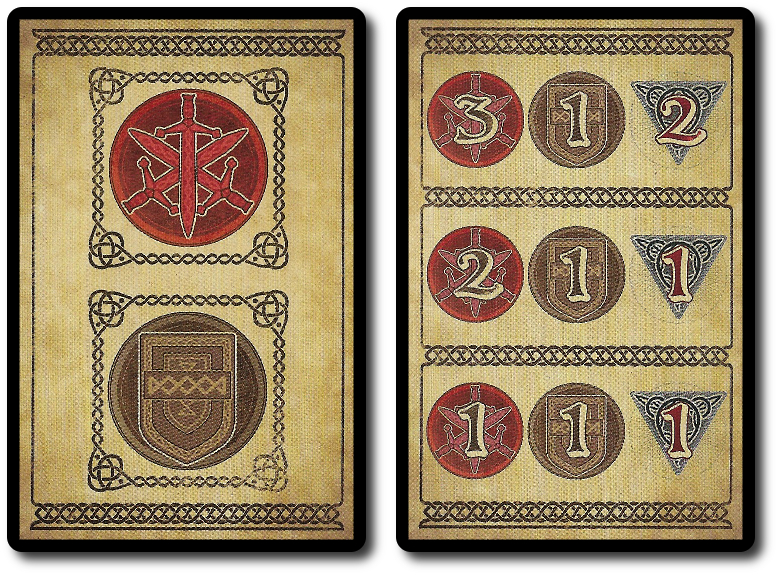
Starting with the First Player and continuing in clock-wise order, each player selects the top-most Earning card from one of the three available piles and places it face-down in front of them without revealing it. The back (and visible to all players) of the Earning card will show one or two icons that represent what the Earning card will be offering the most of. For example, an Earning card with just the Building icon will be primarily focused on Building actions, while an Earning card with a Shield and Honor Point icon will be split between defense and earning points.
Once each player has selected and placed an Earning card, the process is repeated three more times, giving each player a chance to select a total of four Earning cards that are placed face-down in front of them. Cards should be placed in a row with the left-most card being the first the player selected followed to the right with the next card and so on. If at any time one of the three piles of Earning cards is exhausted, all of the discarded Earning cards are shuffled with any remaining Earning cards not yet drawn. Then three new piles of roughly the same number of Earning cards is created.
Step Two: Reveal and Block
All players simultaneous now reveal the first two Earning card they drew (the one on the far left of the row and the one to its immediate right). Each Earning card has three rows. The players now takes one of their Blockers and places it on one of the three rows of their choice on the first revealed Earning card. The row they select will no longer be available to that player. Consequently, all soon to be revealed Earning cards will have that same row (top, middle, or bottom) removed as a possible choice for the player, as well. This means the player is selecting without full knowledge of what is to come.
However, players are not totally in the blind here. The Earning cards they selected suggest what each card will offer. In addition, the top-most row of each Earning card will provide the player with the most of whatever resource the icon on the back of the Earning card showed, with the second and third row providing progressively less. Of course, there is a catch. The more “good stuff” the player collects, the more “bad stuff” (which is in the form of Fomori and Corruption) is also collected. This means if the player wants to be greedy, they should keep the top-most row, but their action has consequences. Less greed means less of a negative outcome.
After all players have placed their first Blocker, all players now reveal their third Earning card and place their second Blocker on one of the two rows that are not currently blocked on their first Earning card.
After all players have placed their second Blocker, each player reveals their fourth Earning card. The row that spans across all four Earning cards without a Blocker represents what the player has earned for this round of the game.
Step Three: Collect Earnings
Beginning with the First Player and proceeding in turn order sequence, each player collects the resources earned as noted on their Earning card row. Remember, only the unblocked row is used. The collection of resources is done in a sequential order. This is because some resources have limits. It’s possible that some players, due to their order in the turn sequence, might not collect what they had hoped to earn.
- Adjust Honor Points: The player adjusts their current tracker on the Honor Track by moving it a total number of spaces equal to the total number of Honor Points earned. The number of Honor Points earned is sometimes conditional. For example, a number of Honor Points earned is equal to the number of Building discs currently in play.
- Collect Buildings: The player collects a number of Building discs equal to the total number of Building icons shown on their Earning card row.
- Collect Swords: The player collects a number of Sword discs equal to the total number of Sword icons shown on their Earning card row.
- Collect Shields: The player collects a number of Shield discs equal to the total number of Shield icons shown on their Earning card row.
- Collect Fomori and Corruption Points: The player selects one Fomori tile and adjust their current position on the Corruption Track by one for each Corruption icon shown. When selecting a Fomori tile (if any are available from the general supply), it’s placed face-down in front of the player. The player who selected the tile and their opponents should not see the other side until later in the game.
- Collect Tactics: The player collects a number of Tactic tiles equal to the total number of Tactic icons shown on their Earning card row. A player can only collect a total of six at a time. After they collect their Tactics, new Tactic tiles are drawn to bring the total number available for the next player to six.
Step Four: Take Actions
Starting with the First Player and continuing in turn order sequence, each player can take up to two actions. These actions can be the same action or two different actions, taken in any order. Any saved resources from the last round can be used at this time. Players continue to take two actions in turn order sequence until all players take the “Pass” action.
Build
The player takes one of their collected Building discs and places it on the Map creating a new fortified location or strengthening an already claimed location. Players can place a Building disc on a location connected via a “road” that is connected to a previously placed Building token they own. The player can also place a Building token on any available Port space if they have a previously placed Building disc on a Port space, too.
The player can also take a Building disc and “fortify” a previously placed Building disc by placing the disc on top of it. No more than a stack of three Building discs are possible. One Building disc is considered a camp, two is considered a tower, and three is considered a fortress.
Or, if the player likes, they can take a Building disc and build an outpost camp. This can be on any space that is connected to an opponent’s previously placed Building disc. Doing so will cost the player two Honor Points (which is indicated by reducing the player’s position on the Honor Point Track).
The only place a player can never build is where Balor’s Castles are currently located.
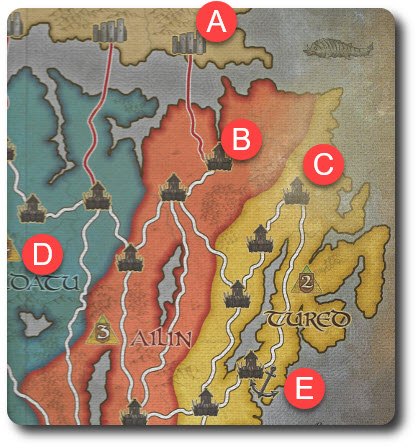
A) Balor’s Castle space
B) Starting Fomori space
C) Location
D) Province (all that is in blue)
E) Port location
Shield
The player takes one Shield disc and places it in the same Province where the player has at least one fortified location. A Province cannot hold any more than that number found in the Province (referred to as the “Province Bonus”). The same number is also used at the end of the game to possibly award additional Honor Points.
Spread
The player can only take this action if that have more than one fortified location on the Map.
The Fomori are large monsters that roam the land. Placing a Fomori tile has consequences, but it should not be suggested that the negative backlash falls on the player who places the Fomori. Like the Building discs, the Fomori can only be placed on certain locations. The free location must be connected to either Balor’s Castle or another Fomori tile. And by free, I mean the location is not occupied by another Fomori.
The player must first do a little math. From the total number of face-down Fomori tiles they have collected, they take a number of tiles equal to the simple formula that follows:
Fomori tiles places equals…
number of Shield discs in the Province where the Fomori will be placed
+ Building discs at the location where the Fomori will be placed
+ one for every Fomori
The total number indicates how many Fomori tiles the player takes aside from the total number of Fomori tiles they have collected. If they cannot take that number, they cannot take this action for that specific location they want to spread into.
From the Fomori set aside, the player selects one and reveals it, flipping it face-up. The rest that were set aside for this action are sent back to the general supply, face-up. The Fomori is then placed in the free location or placed in the location where that was fortified. All Shield discs are removed from that Province and if there were any Building discs in the location where the Fomori was placed, they are returned to the general supply. Yes, players can destroy their own fortified locations, which sounds wrong, but this is a good move depending on how the game is going.
Repel
The player spends Sword discs to fight the dreaded Fomori. The Fomori tile to be fought must be connected to a location on the Map where the player has at least one Building disc, from a Port location to another Port location, or within the same Province (colored locations on the Map).
The player can also spend two Honor Points to take the fight to a Fomori that is not connected or in the same Province, but does border another opponent’s Building disc.
The value in red indicates the total number of Sword discs that must be spent and returned to the general supply if the player hopes to remove the Fomori (or the Balor’s Castle) from the Map. Removed Fomori are returned to the general supply, but Balor’s Castles are kept by the player who defeated it. When attempting to take out the castle, the player must first remove the Fomori that occupies it.
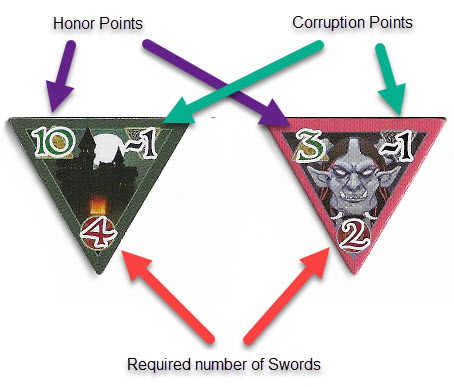
After the tile is removed, the player immediately earns any noted Honor and Corruption Points on the tile.
Free Actions
As a free action (meaning it does not count towards the player’s limit of only two per turn), the player can use as many Tactic tiles as they like before or after resolving another action. Tactic tiles give the player a number of Honor Points based on current game conditions. A few can also be used during Step Two: Reveal and Block, giving the player the ability to move Blockers. Tactic tiles can also give the player the ability to swap positions of Fomori and Buildings on the Map and decrease Corruption Points. Each Tactic tile is different. Once used, it’s discarded to the general supply, face-up.
If the player has collected a Balor’s Castle tile, they can remove it from the game (by placing it back in the game box) and then send three Fomori tiles they currently have back to the general supply without looking at them.
Pass
If the player has no collected Fomori left or is not able to place them (due to not having enough to complete the Spread action in any province), they can pass. The player can then select three resources (Building, Sword, or Shield in any combination) and place them on their Tribe Leader card. Only three resources can be held at a time. These resources can be used by the player during the next round of the game.
All remaining Fomori, Shields, Buildings, and Swords still in the player’s possession are returned to the general supply. Players keep any unplayed Tactic tiles. If the player was the first to pass, they will take the First Player tile for the next round.
Passing immediately ends the player’s turn for this round. They cannot take a second action or any free actions if their first action was to pass.
Step Five: Ending the Round (and Possibly the Game)
After all the players have passed, the round ends. Players check for game ending conditions. If they are not met, the Round Counter is moved to the next space in sequential order and the First Player tile is given to the player who first passed. A new round now begins.
The End of the Journey
The game ends when a round is completed and a player has earned more Corruption Points than allowed (based on the number of players) or the round just completed was the final round (again, based on the number of players). The winner of the game is now determined.
The winner is based on the conditions found on the Map. If the players have fortified more locations than the Fomori currently occupy, the player with the most Honor Points wins the game. However, if the Fomori occupy more or an equal number locations as the player’s fortified locations, the player with the fewest Corruption Points wins the game. Before the winner of the game can be determined, players adjust their scores based on bonus points earned.
Game Variant
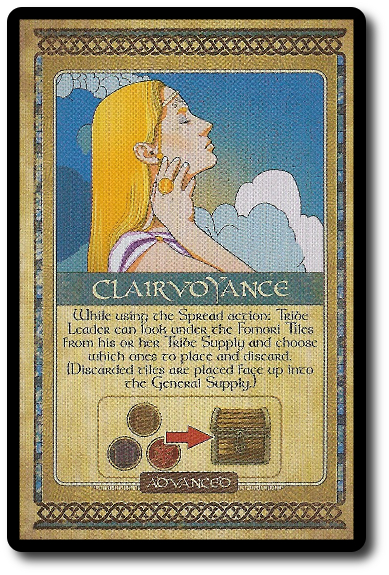
The game summarized above is considered the “basic game”. An advanced version is also available for those seeking a more complex gaming experience. To play the advanced version, flip the Tribe Leader cards over. Described on the card is an action that only the owning player can take.
To learn more about The Arrival, visit the game’s web page.
Final Word
 The Child Geeks quickly grasped the game’s rules, but were slow to pick up on the game’s subtleties. The game is about managing the Map, the player’s interests, and their opponents. In essence, the player is working the game from two different positions. Specifically, the Fomori (corruption) and their tribe (honor). According to one Child Geek, “Wow, I totally didn’t get this game until it was almost over. You really have to watch the tracks if you want to win.” This Child Geek got it absolutely correct. With victory being given to the player based on the end of game Map conditions, players have to manage their own point values throughout and adjust accordingly. Another Child Geek said, “I like the game, but it is tough.” To be clear, the game play is not tough. Actually, the game is pretty easy and straightforward. What makes it complicated is determining what actions to take to earn short-term bonuses and reduce the long-term risk of losing. Despite the learning curve and a lot of disappointed faces on players who thought for sure they would win (but didn’t), The Arrival earned their approval.
 The Parent Geeks found The Arrival to be an easy game to learn and a lot of fun to play. According to one Parent Geek, “What I like a lot about this game are two things. First, I really like how the players have to pick their resources. Second, I really like how the victory you want to go for keeps changing.” The Parent Geeks also found that they had a lot of control over which victory condition would be used to determine the game’s winner, but that didn’t mean they had complete control. As one Parent Geek put it, “It’s like driving a car, but everyone has their hand on the wheel.” Well said! Players can only take control of the car (that is, the game) on their turn by using the actions they earned by collecting resources. All the Parent Geeks voted to approve The Arrival.
 The Gamer Geeks approved of the game pretty quickly, finding it to be an experience that provided tactical thinking, strategic play, and lot of possibilities. But none of the Gamer Geeks found The Arrival to be a perfect game. According to one Gamer Geek, “Decisions are always meaningful in this game, and I like how the resources are determined. Everything else works but is not overly exciting and somewhat forgettable.” Another Gamer Geek said, “The game is far from a masterpiece, but nor is it junk. I enjoyed it, but was never terribly thrilled by it. I mean, how to put this? I enjoyed it and would enjoy it again, but was never really thrilled about it.” What this particular Gamer Geek is struggling to describe is what the majority of the Gamer Geeks also felt. They liked the game, but were not overly in love with it. It entertained, but did not thrill. It seemed to miss a certain something, but none of the Gamer Geeks could identify what the missing something was. The game, after all, was complete and did its job. In the end, the Gamer Geeks all voted to approve the game, but mostly because they couldn’t come up with a reason not to.
 Having played many games by Mr. Martin Wallace, I found The Arrival to be one of his weaker offerings, but no less entertaining. The Arrival felt “middle of the road”. There wasn’t a single experience during the game that felt like it defined the game. Although, I will say I really liked the way resources were collected. This was the only part of the game that tickled my fancy. The rest of the game felt very “adequate”. Which is to say, it did its job and did it well in a rather robotic way. Like the Gamer Geeks, I had difficulty putting my finger on what it was that made me feel somewhat distant from the game, and yet still enjoy it.
The only aspect of the game I didn’t like was the clumsiness that is determining how many Fomori to put aside when taking the Spread action. While the math is not complicated, it always felt like a chore. This made placing the Fomori on the Map feel like the least exciting and interesting part of the game. Which I’m pretty sure is all kinds of wrong. Add in the fact that a player cannot pass if Fomori can be placed and you have a situation where players find themselves asking for help when determining if any Provinces can take a Fomori. There were several games where all the players were observing the Map, doing math in their head so they could move the game along without risking an opponent getting a Pass when they legally couldn’t.
Overall, The Arrival was fun, but not great. Entertaining, but somewhat forgettable. I liken it to a good meal. Sure, you enjoyed it and feel satisfied, but the next day you won’t be thinking much about it. Seriously, what did you eat last Thursday? That’s what I’m talking about. You know you had something but you cannot recall if you really enjoyed it or not. All you can say is that you feel very confident that you pushed away from the table feeling done and satisfied.
That’s The Arrival in a nutshell.
Good game? You bet. Great game? Afraid not. It still did well enough to earn everyone’s respect, from the Child Geeks to the Gamer Geeks and everyone in between. That is, by far, the real story here. The game satisfied everyone who pushed away from the table. Do give it a try when the opportunity presents itself to see if The Arrival leaves you feeling like you have landed on something worthwhile or you eagerly begin looking for the next opportunity to leave.
This game was given to Father Geek as a review copy. Father Geek was not paid, bribed, wined, dined, or threatened in vain hopes of influencing this review. Such is the statuesque and legendary integrity of Father Geek.